
I honestly don’t know what I’d do without Rex. I’m talking about my robot vac, of course. But I never thought about building her her very own robot vacuum garage, until now.
I thought I was the only one who named their smart appliances, but nope. Hanna has Thor, and Thor needed a parking spot.
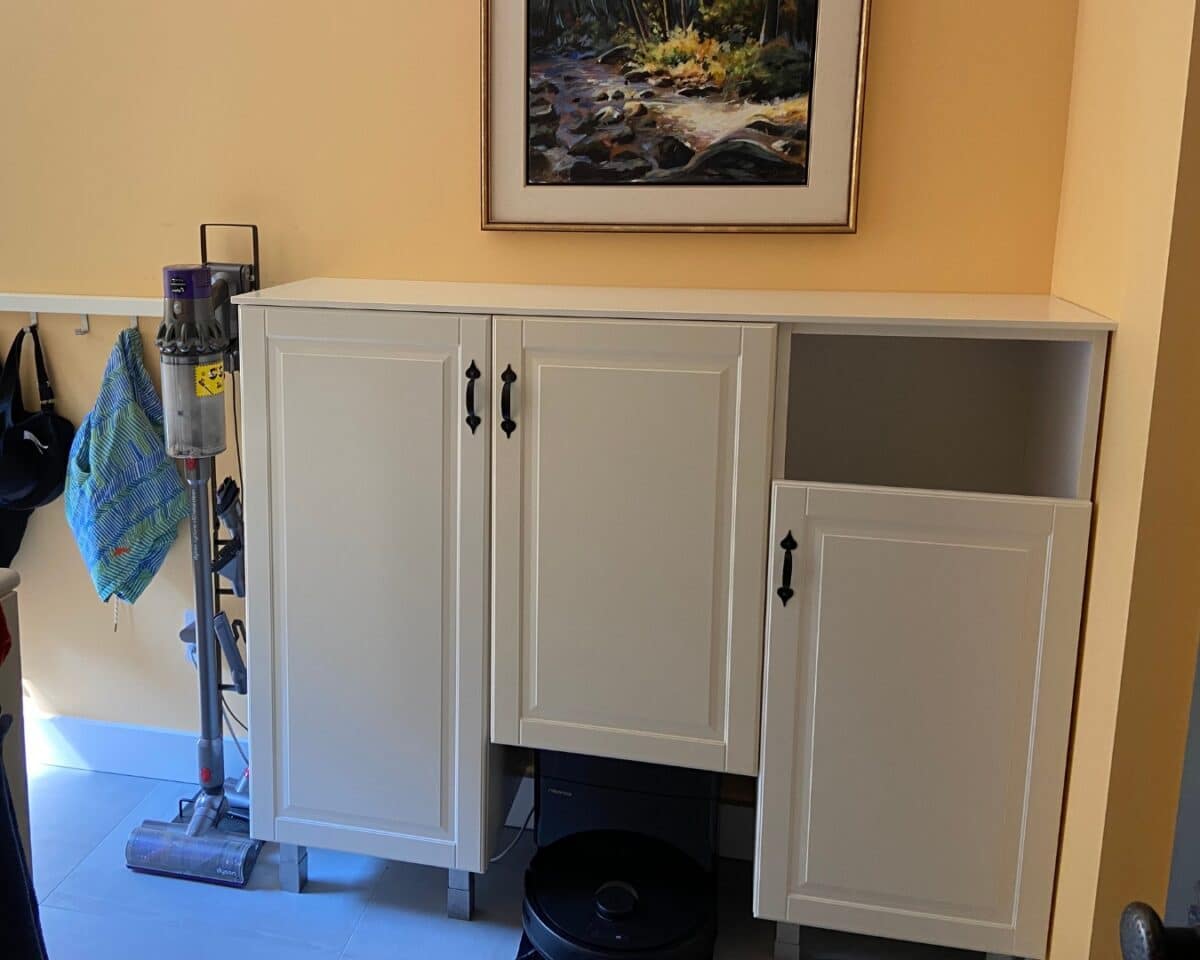
Hanna Sjoeborg used IKEA kitchen cabinets to create a laundry and cleaning station that adds storage, a hamper, and a garage for her automatic vacuum.
The result is an organized, streamlined unit that matches the rest of her laundry area, making the space more efficient.
What You’ll Need
- 2 IKEA SEKTION (or similar kitchen) cabinets in the same height
- 1 IKEA SEKTION (or similar kitchen) cabinet in a shorter height
- 2 Two-packs of IKEA ENHET legs (or similar)
- 1 IKEA cabinet door to match the taller cabinet
- 2 IKEA cabinet doors to match the shorter cabinet
- 1 IKEA side panel to create the top of your unit
- 3 Door handles
- White contact paper or hole caps
- Adhesive or L-brackets
- Basics — screw gun, drill, tape measure, pencil
Step-by-Step DIY Guide to Creating a Robot Vacuum Garage and Laundry Station
1. Assemble the Cabinets
Put together the three cabinets according to IKEA instructions. On one of the shorter cabinets (the one you’ll use for your robot vacuum garage), leave off the front cross bar.
2. Mount the Cabinets
Secure the cabinets to the wall using the appropriate hardware. Place the shorter cabinet in the middle and mount it upside down.
Doing it this way leaves the bottom open to allow space for your vacuum and charging device. (This is also why you left off the cross brace in the front.)
Add the four EHNET legs, or whichever style legs you prefer. Hanna used a few IKEA legs that she happened to have in her basement. Place two legs on the bottom of each end cabinet.
3. Add the Doors
Add the tall door to one of the tall cabinets. Then, add the two shorter doors to the remaining two cabinets.
When placing the door on the end cabinet that doubles as the hamper, the door should line up with the bottom of the cabinet. Consequently, you should have a space between the top of the door and the top of the cabinet, making it easy to toss in dirty clothes.
4. Install the Top
Place the side panel across the three cabinets and secure it in place. You can use a heavy-duty adhesive, or L-brackets on the ends, or both. This gives you a nice, finished look on the top, covering the seams where each cabinet meets.
5. Complete the Finishing Touches
Cover the holes of the open part of the cabinet with white contact paper or caps. Next, add your door handles of choice. For extra storage, add some baskets to the inside of the middle door to hold your vacuum’s supplies. Hanna plans to do this with her station soon.
Make This Cleaning Station Work for You
If you don’t have a robot vacuum, this hack is still a great way to add storage to your laundry area. Just get a cabinet the same size as the other two and mount it right-side-up.
You’ll note that specific measurements aren’t provided for the cabinets in this hack. That’s because it’s up to you and your available space. Therefore, consider how much room you want to fill and what you’re trying to accomplish.
You can use two cabinets, three, five, or more. However, no matter how many you end up using, carefully plan out your design first. Finally, sketch it out and make sure you know exactly what you need.
Tips to Keep Your Robot Vacuum Garage Functional and Stylish
I love the idea of installing a shorter door on one of the cabinets to create an easy-to-access laundry hamper. I would place a laundry basket inside to make transferring the dirty clothes a breeze. The solid surface on top also makes a great folding station.
You can fit the cabinets with all sorts of pull-outs, shelves, and other accessories to maximize the storage capabilities.
What do you think? Can you see this robot vacuum garage hack in your laundry room? How would you optimize it for your space?
Got an IKEA hack of your own? We want to see it! Submit your project here or tag us on Instagram @ikeahackersofficial.